Want to give your IKEA Koarp chair a fresh new look without spending a fortune? Since IKEA Koarp slipcovers are discontinued, finding a replacement can be expensive. Instead, why not make your own custom slipcover?
This DIY IKEA slipcover tutorial will show you step by step how to sew a slipcover for your IKEA Koarp chair. It’s a budget-friendly upholstery hack that’s beginner-friendly and will completely transform your chair!
If you have an old slip cover, you will need to carefully take it apart to turn it into your pattern. Don’t have an slipcover? Don’t want to spend the time to rip every seam? You can buy my IKEA Koarp chair compatible pattern in my Etsy shop.
These chairs also feature custom legs we made, tutorial coming soon!


Materials Needed – What You’ll Need to Sew a DIY IKEA Koarp Slipcover
Before you start, gather the essential materials for your DIY IKEA slipcover tutorial. This project is budget-friendly, and you can even upcycle old fabric to save money!
🛠 Tools & Equipment:
✔ Printer & Paper – To print the IKEA Koarp slipcover pattern (68 pages)
✔ Sewing Machine – A basic machine is all you need!
✔ Serger (Optional) – Helps finish seams for a washable, professional finish
🧵 Fabric & Sewing Supplies:
✔ Fabric – Best choices include:
- Denim (naturally durable with slight stretch). I used 5 pairs of old jeans.
- IKEA Curtains (a budget-friendly upholstery hack!). I used IKEA Sanella curtains.
- Cotton-blend fabric with 5-10% polyester for flexibility.
✔ Matching Thread – To blend seamlessly with your fabric
✔ Zipper Tape (5mm) – For the removable slipcover design & cushion covers
✔ Velcro Strips – Helps keep the slipcover secure
💡 Tip: If you’re using recycled fabric (like old jeans or IKEA curtains), ensure you wash & press it first to prevent shrinkage!
Step 1: How to Print & Assemble Your DIY IKEA Koarp Slipcover Pattern
The are 4 files in the PDF pattern that is sized for A4 / letter format:
- Side Arm
- Back of Chair, Front Flap, Seat Cushion
- Back Cushion
- Lining Pieces (seat center and bottom of seat cushion)
Print each file one at a time:
- Set your printer scaling to 100%
- Use the test square – Print just the first page to check your settings.
- Once confirmed, print the rest of the pages.
- Cut & assemble the pattern pieces using the grid alignment (A1 to E4).
- Seam allowance is included – The pattern includes 1 cm (3/8″) seam allowance.
Step 2: Cutting Out Fabric for Your Custom IKEA Koarp Slipcover
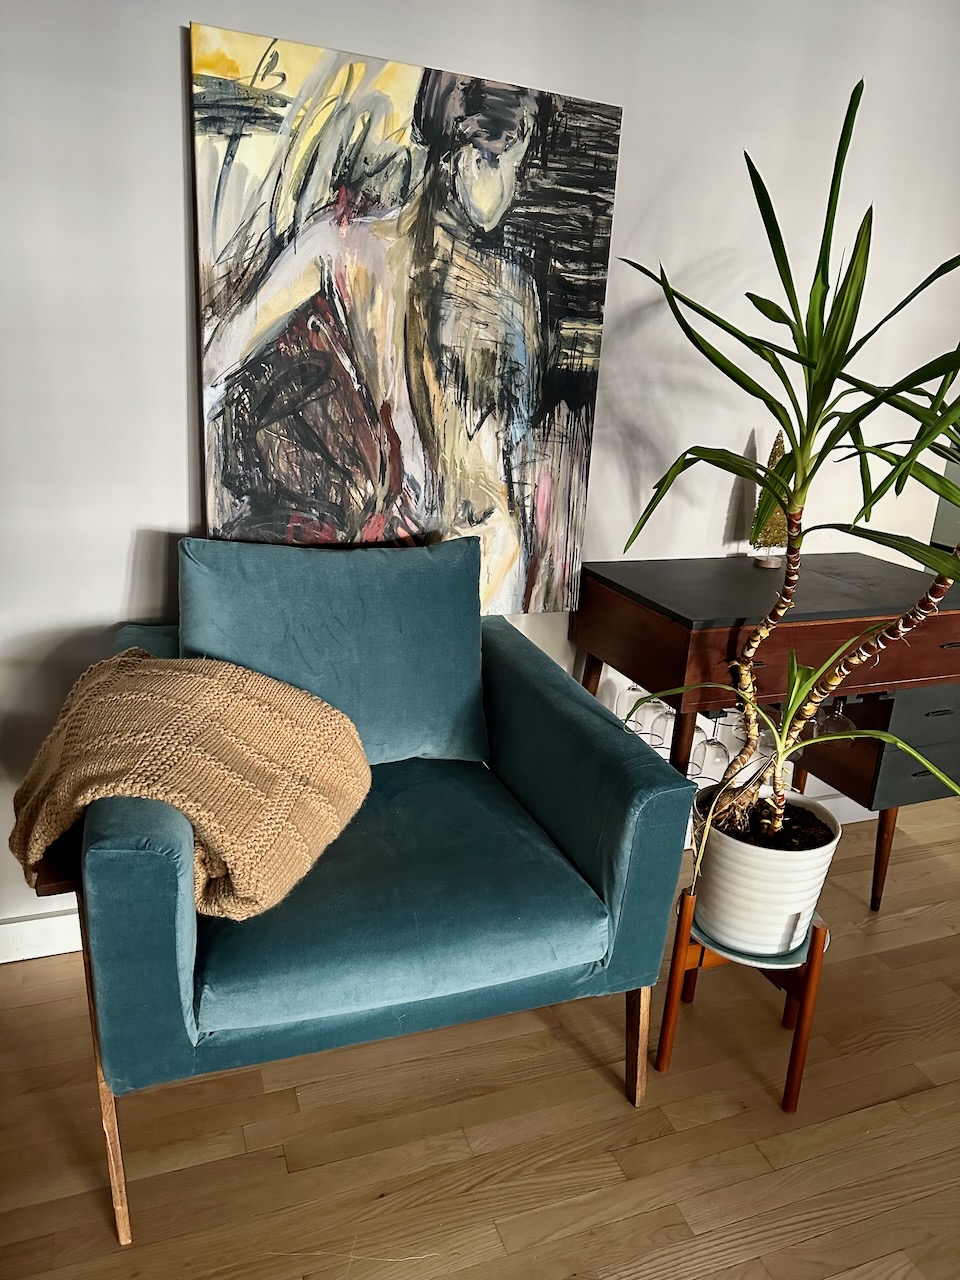
I used IKEA Sanella curtains to make the solid slip cover above. This is a great hack to save on upholstery fabric. Here’s how I optimized the fabric layout:
✔ First Panel Cuts:
- 1 Side Arm
- Back of Chair
- Front Flap
- Half of the Back Pillow
✔ Second Panel Cuts:
- Mirrored Side Arm (double-check it’s flipped!)
- Seat Cushion
- The other half of the Back Pillow
💡 Tip: Ideally, cut the back pillow from one continuous piece. If necessary, sew two halves together—just remember to add a seam allowance!
I cut the lining pieces from inexpensive IKEA fabric. They are close in size, and I suggest marking them until you are ready to start working with them.


Step 3: Sewing the Main Chair Cover – Attaching the Pieces
Attach Flap to Seat Lining
- Find the center line – Fold both the seat flap and seat lining in half and mark the centers
- Align & pin – Match the center lines and pin the shorter edge of the flap to the straight (not rounded) edge of the seat lining.
- Sew the pieces together, keeping a consistent seam allowance.
- Set aside for later assembly.

Attach Side Arms To Back Of Main Chair
- Align the curved edges of the side arm pieces with the back panel of the chair.
- Pin along the curved edges, ensuring smooth alignment.
- Leave ~15-16 inches open at the bottom – This is where the zippers will be installed to make the slipcover removable.
- Sew along the pinned edges, being careful to ease the curves for a smooth fit.


Attach Seat Lining To Main Seat Body
- Find the alignment points – Use the rounded corners of the seat lining to match where the side arms and back panel meet.
- Pin & sew the seat lining to the main slipcover body.
- Note: The flap will be longer than the side arm pieces—this is intentional and will come together in the next step!
- Sew all around, carefully pivoting at the corners to avoid tucks or fabric bunching. Pro Tip: When sewing corners, stop with the needle down, lift the presser foot, pivot the fabric, and continue sewing.


Test Fit The Main Chair
- At this stage, the slipcover won’t fit perfectly yet because the arm corners and back zippers are still open.
- Do a quick test fit over your chair to check for alignment issues or fabric tension problems.
- Making progress? Great! Seeing progress can keep you motivated!

Closing The Corners Of The Side Arms
- Using the corner as your pivot point, close the side arms.
- This where you will also extend to the flap, pivoting that gently as well.
- Separately, close the triangles in the side arm bottoms, simply aligning the triangle sides.


Progress Check Before Zippers
- By now, your main chair cover should be fully assembled except for the zippers.
- The original IKEA slipcovers use Velcro inside each arm and back, but I find that the seat cushion keeps the slipcover in place without Velcro. Optional: If you want extra security, consider adding small Velcro strips inside the arm sections.

Install The Main Chair Cover Zippers
- Press seam allowances and pin the zipper tape in place. Ensure your zipper closes by sliding down, not up!
- Using a zipper foot, attach the zipper ensuring you are creating a stop at the top.
- Fold the ends under to create the stops on the bottom of the chair.


Attach Velcros To Hold Slipcover In Place
- Put your seat cushion in to ensure proper tension of the chair cover and flip your chair on the side.
- Attach velcro to the strips stapled to the chair. My velcro came with heavy duty sticky tape so I simply used that to attach it to the fabric. I promised myself that I will properly stitch it in place next time I need to remove the slipcover to wash it.


Your main chair cover is now complete!
Step 4: Sewing The Back Cushion
It is assembled like a zippered pouch and it goes quickly!
- Press the zipper opening seam allowance.
- Align the zipper tape to make sure the cushion cover is even.
- Pin and stitch the zipper.
- Stitch the side seams.
- Stitch every corner (see picture).


Step 5: Sewing The Seat Cushion
Attach the lining of the seat cushion to the longer end of the main seat cushion part.


Next, close the corners. On the longer side, fold around and stopping at the lining.

You will end up with a box like this once you connect each corner.

Starting with the main fabric, put the right sides of the zipper tape and the main fabric together and attach one side of the zipper tape.

Then starting with aligning the corners of your lining with the corner of your main fabric cover, align the lining so the zipper is positioned evenly without creating any twists or gaps. You may need to readjust a couple times. I think these clips are the best inexpensive tool any sewist can have and they certainly help in quick adjustments here! Unzip your zipper before stitching so you can turn everything inside out.

And that’s it—your DIY IKEA Koarp chair slipcover is complete!
Did you try this project? Drop a comment below with your experience!
Final Thoughts – Is Making an IKEA Koarp Slipcover Worth It?
The slip cover is really what IKEA is all about. It’s made extremely simply, minimizing materials and work, but ends up being a decent looking product. I spent $65 on the curtains and the entire project took me a few hours. The fabric was also of higher quality than many Koarp replacement covers on the market. I think it’s a great way to save money and refresh your Koarp chair.
I also spent several hours taking apart my old Koarp cover so you don’t have to! Don’t forget you can grab the pattern here.
For more IKEA furniture hacks, visit IKEA Hackers for inspiration!