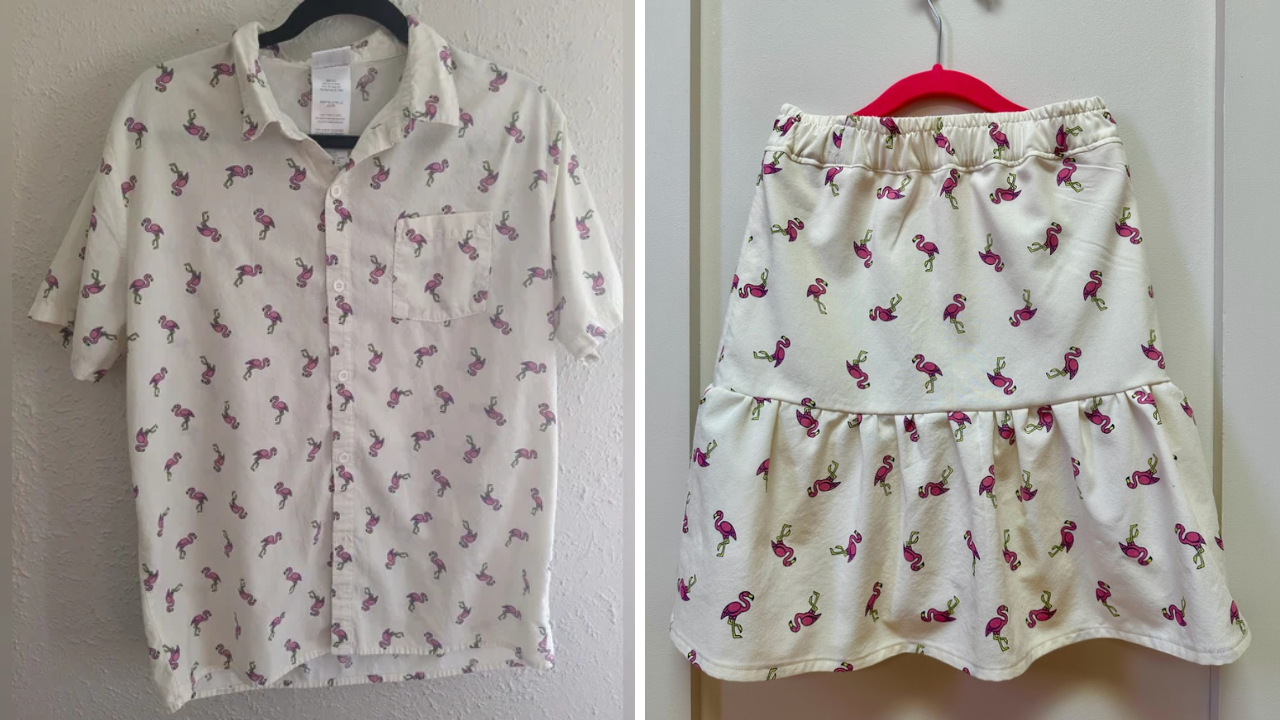

This DIY thrift flip sewing project started with a $3 thrift store shirt. The fabric was a cotton / rayon blend with a cute flamingo print. The shirt showed no signs of wear. I decided to upcycle it into a DIY skirt.
In this step-by-step tutorial, I’ll show you how to refashion a thrifted shirt into a skirt using simple sewing techniques. This is an easy sewing project for beginners and a fun way to turn secondhand finds into wearable fashion.
Looking for a pattern? You can create your own with these free instructions! Let’s get started!
Step 1: Deconstruct the Shirt for Maximum Fabric Use
I deconstructed the shirt by cutting along every seam as close to the seam as possible to maximize fabric use. This method ensures a clean, even surface to work with for my DIY clothing refashion.

Step 2: Check Pattern Placement Before Cutting
Once the shirt was deconstructed, I laid out my skirt pattern to check the fit. The fabric was just enough to cut both yokes and flounces, making it a perfect fit for this skirt from a shirt project. I was just a little short on the waistband, so I needed to piece those from 2 cuts. I created these free instructions so you can make your own pattern just like this.

Step 3: Cutting Out the Skirt Pieces
I sewed together the two shirt fronts and used the seam as my fold. I cut out 1 yoke (on fold), 1 flounce (on fold), and partial waistband (keep reading to see how I handled creating the waistband).

My design and this print were pretty forgiving but I still tried to cut the opposite yoke, flounce and waistband matching the print line so the flamingos formed continuous lines around the skirt. I find it odd when the side seams cut the print and it jumps from front to back!

Since the original fabric was thin, I decided to add a cotton voile lining to prevent it from being see-through. If you’re new to refashioning old clothes, this step is optional but can add structure to lightweight fabrics. I cut the lining 2 inches shorter than the outer skirt layer for a professional finish.

Admire all your cut pieces. Your shirt is now transformed into the beginning of something new. Unless I am rushing to complete a piece, I take a break after cutting and start assembling the next day (or next free day). What about you?

Step 4: Sewing the Skirt Together
Assemble the Waistband
I am obsessed with pressing as I go. For this elastic waistband skirt, I prepped the waistband by folding it in half and pressing one edge under with the seam allowance. I also used a thin strip of cotton voile as a stabilizer to keep the elastic secure.

Sew the waistband into a loop. If you had to piece it from a couple parts, try to space out the seams. I loved that my elastic came from another upcycling project!

Assemble the main skirt pieces and optional lining
Sew the yoke and flounce side seams. In my case, I did the same with the lining pieces.

Hem the skirt
Hem the bottom of the flounce (main and lining). Again, I like ironing the seam before sewing because it makes sewing much quicker and easier. I don’t need to fold anything at the machine. I know everything will line up and I can adjust while I iron and make sure things are even across the entire hemline.


Assemble the skirt
Attach the flounce to your yoke. The flounce is wider than the yoke by design, so you’ll need to gather it slightly.
- Sew a long gathering stitch (5.0-6.0) within the seam allowance. Example: If your seam allowance is 1 cm, place your gathering stitch about 0.5 cm from the edge.
- Pin at key points (side seams and center) to ensure an even gather.
- Gently pull the thread in a few places and distribute the gathers evenly.
Now, sew the flounce to the yoke, ensuring the gathers don’t shift while stitching.


Attach the waistband
Attach the waistband to the skirt. While a simple way would be to just fold the band in half and sew it to the skirt, I prefer to hide the top seam inside the belt. First with the right sides together, align the waistband with the top of the yoke.
Side note: I tried attaching the elastic to the band before sewing it onto the skirt, but I didn’t like that method. I’ll share an easier method in my next tutorial.

Then once it’s attached, you just flip it over, hide the seam inside and top stitch. Because I created a nice fold using an iron at the very beginning, it was very easy and precise to finish.

Final Thoughts: Is Upcycling a Thrifted Shirt Worth It?
And just like that—my thrift flip transformation was complete! I loved this project. This is a great upcycling project for beginners because it doesn’t require advanced sewing skills and resulted in a stylish and sustainable piece.
If you love sustainable sewing projects, I’d love to see your creations! Have you tried making a DIY skirt from a thrifted shirt? Share your tips, photos, and experiences in the comments below!